
Overview
You can enable SAML-based Single Sign-On (including Just-In-Time (JIT) provisioning with SAML) for the Persona Dashboard via Okta by following this guide.
By default, users can choose to login through SAML or via email and password. SAML enforcement can be configured by navigating to Organization > Security for a user with Admin permissions.
Retrieve your Organization Slug
Log in to your Persona dashboard as a user with Admin permissions.
- Navigate to Organization > Security.
- Under Single Sign-On, click Set up.
- Here, you’ll find your Organization Slug.
Make note of your Organization Slug. You’ll need it in the next steps.
Add Persona to Okta
- Log in to your Okta organization as a user with administrative privileges. Make sure to switch to the Admin Console with Classic UI. The new UI does not currently support SAML based integrations.
- Click Applications in the menu bar. Then click Add Application and then Create New App.
- In the Create a New Application Integration dialog box, leave Web as the platform and select SAML 2.0 as the protocol. Click Create.
- On (1) General Settings, enter Persona as the name of the new Application. Click Next.
- On (2) Configure SAML, enter the following for the fields.
General
- Single sign on URL:
https://withpersona.com/saml/<ORGANIZATION-SLUG>/acs - Audience URI:
https://withpersona.com/saml/<ORGANIZATION-SLUG>/metadata - Name ID Format: Unspecified
- Application username: Email
ORGANIZATION-SLUG comes from the first section (Retrieving your Organization Slug)Attribute Statements
| Name | Name format | Value |
|---|---|---|
user_email | Unspecified | user.email |
name_first | Unspecified | user.firstName |
name_last | Unspecified | user.lastName |
- Click Next and then leave any feedback.
- Get your Identity Provider metadata XML URL for Persona to integrate back with Okta. This can be found under the Sign On tab in the SAML 2.0 callout by clicking the Identity Provider metadata link. Copy the URL and keep it handy for the next steps. The format of the URL should look like
https://dev-12345.okta.com/app/abcdefg/sso/saml/metadata
Complete the Okta integration in Persona
- Log in to your Persona dashboard as a user with Admin permissions
- Navigate to Organization > Security.
- Under Single Sign-On, click Set up.
- Enter in the Metadata URL you obtained from the last step in the Adding Persona to Okta section.
- Click Get metadata.
If done successfully, you should see a notification letting you know that your Okta integration has been set up.
Logging in to Persona through Okta
- To log in to Persona through Okta, first make sure that the user has been assigned to the Application in Okta.
- The user should then see Persona in their Okta dashboard. By clicking Persona, they should automatically log in to their Persona dashboard.
Renewing an expiring SAML SSO certificate
SAML signing certificates expire. Persona monitors your certificate’s expiration and will remind you before it lapses, but the replacement certificate has to be generated and activated in Okta and made available to Persona.
If Persona already has your live Identity Provider metadata URL on file, we automatically pick up the renewed certificate once you’ve activated it in Okta — no further action is needed on the Persona side. If your integration was set up by uploading a static metadata XML file instead of the live URL, you’ll need to re-upload the updated metadata after rotating the certificate.
Generate a new certificate in Okta
- Log in to your Okta organization as a user with administrative privileges. Switch to the Admin Console with Classic UI.
- Go to Applications and open the existing application you use for Persona login.
- Click the Sign On tab.
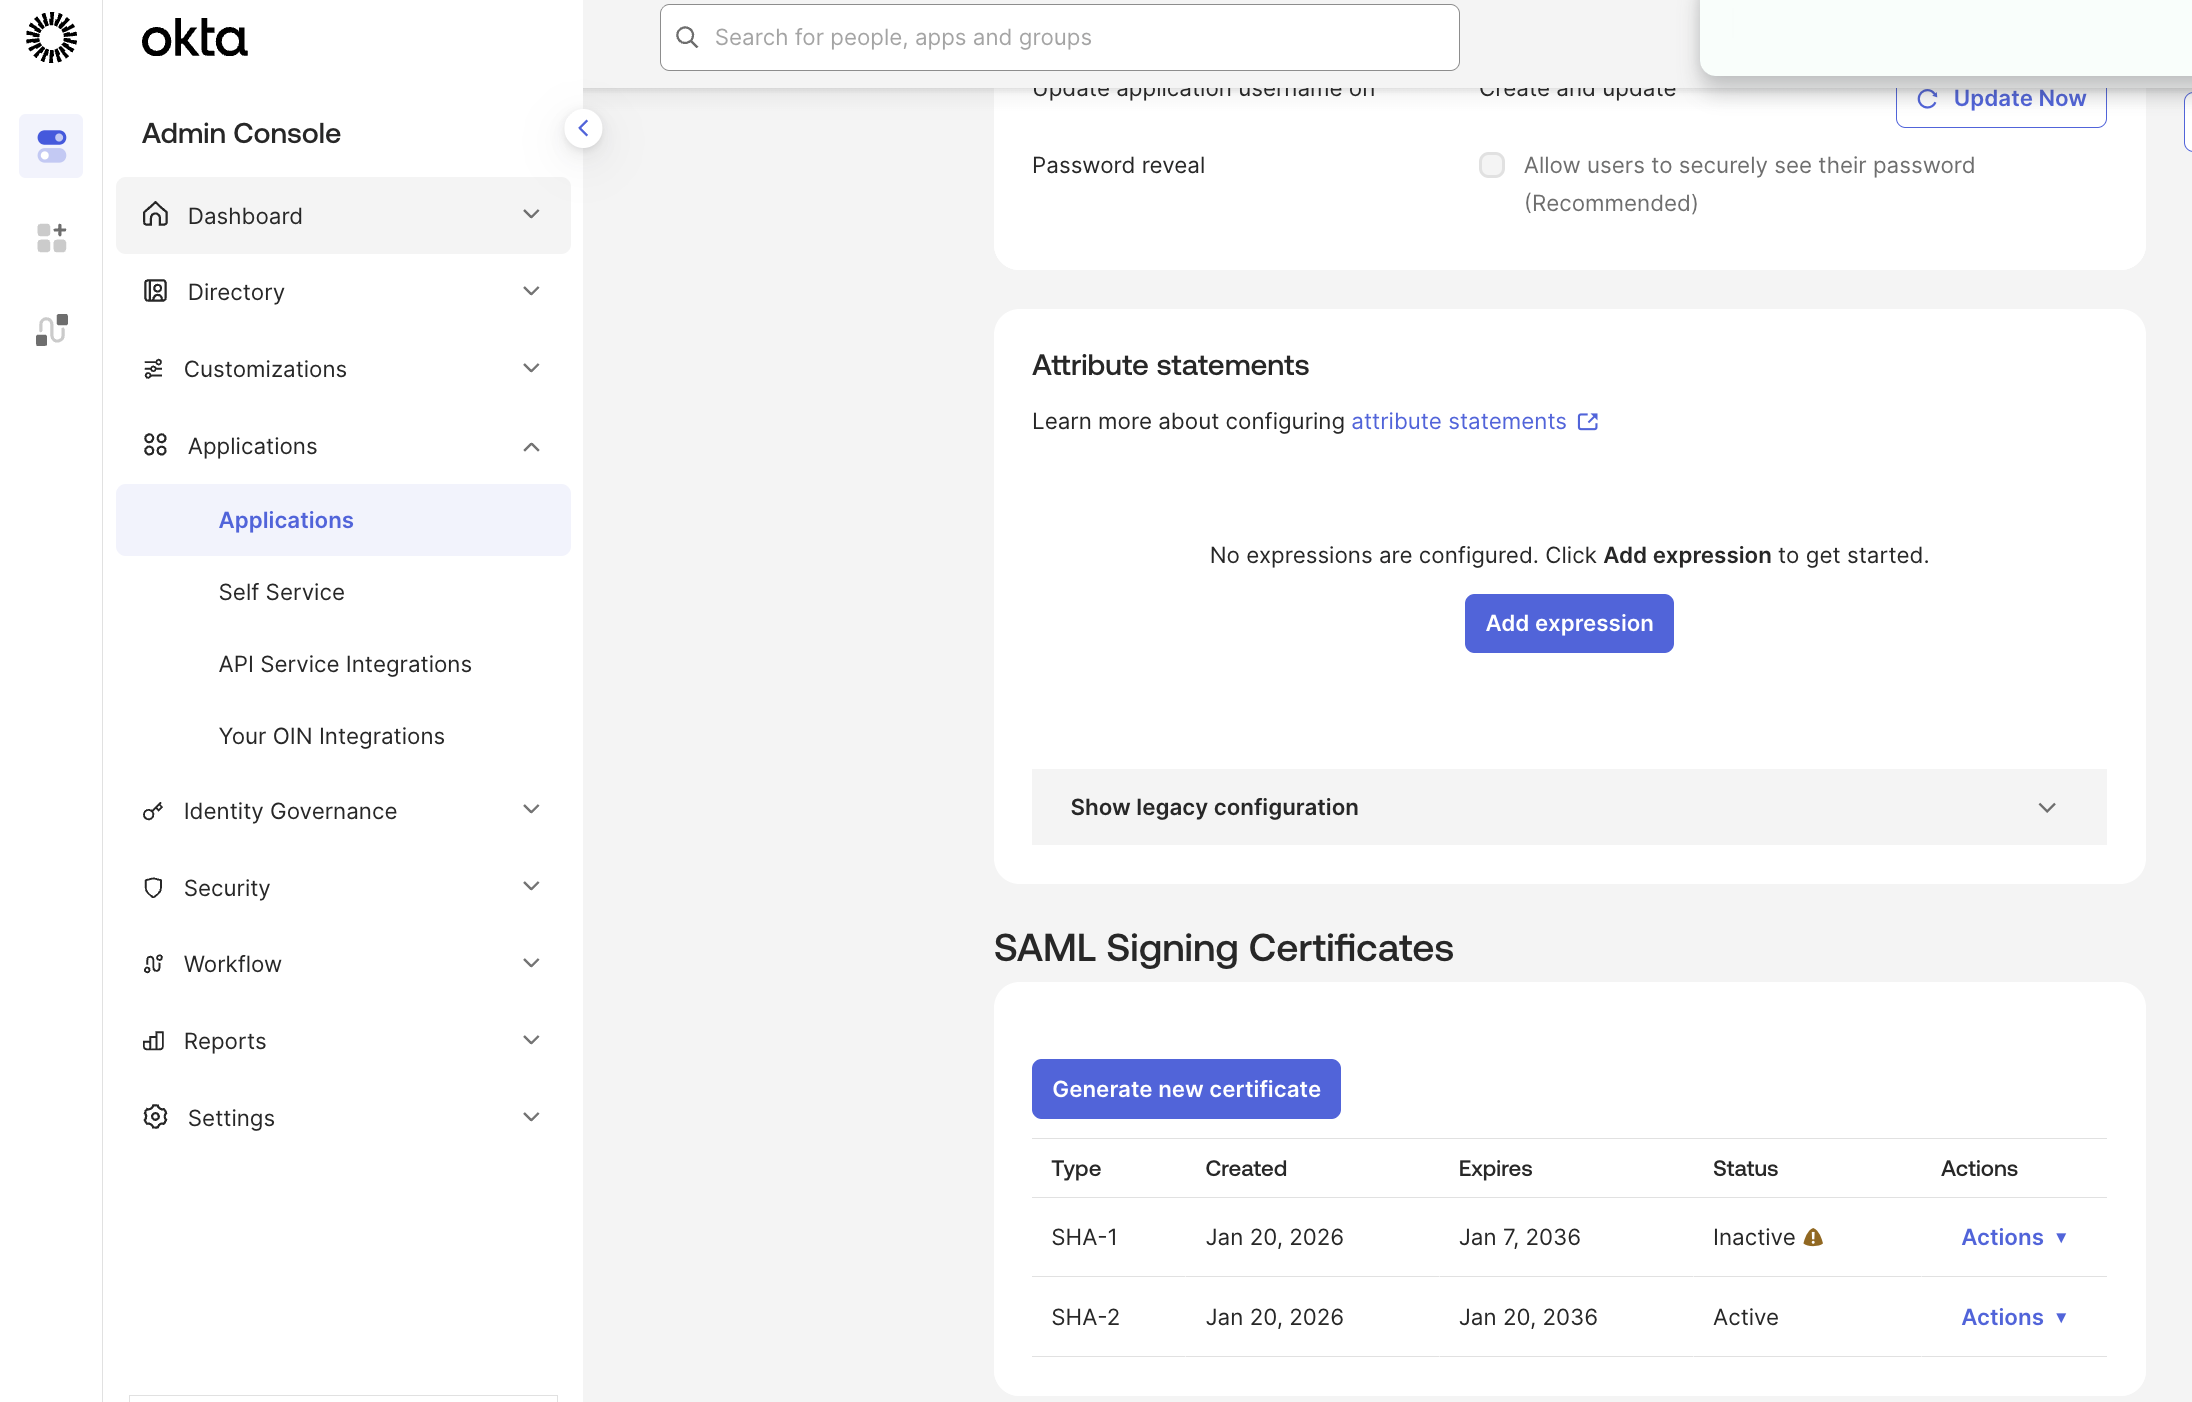
- Scroll to the SAML Signing Certificates section and click Edit.
- Click Generate New Certificate. A new certificate row appears with a status of Inactive.
Activate the new certificate
- In the SAML Signing Certificates table, find the newly generated (Inactive) certificate row.
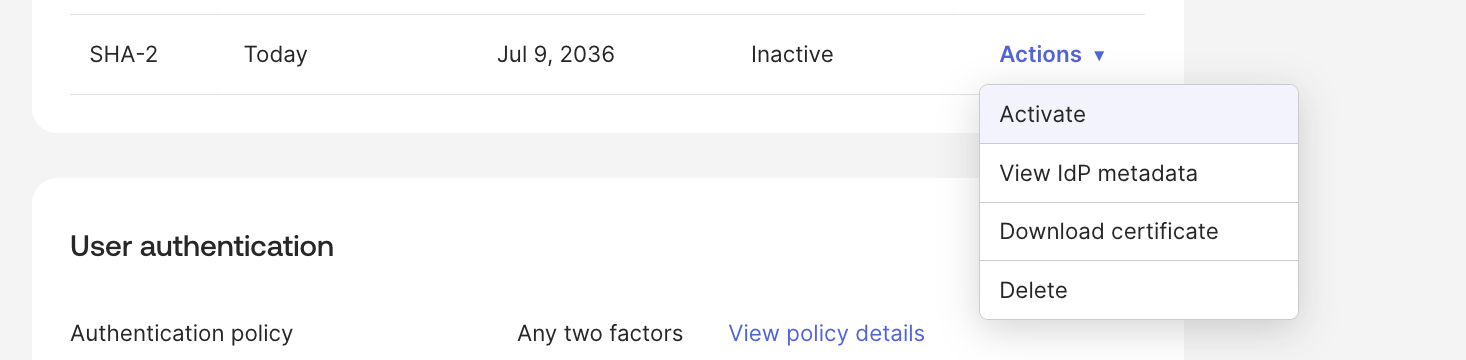
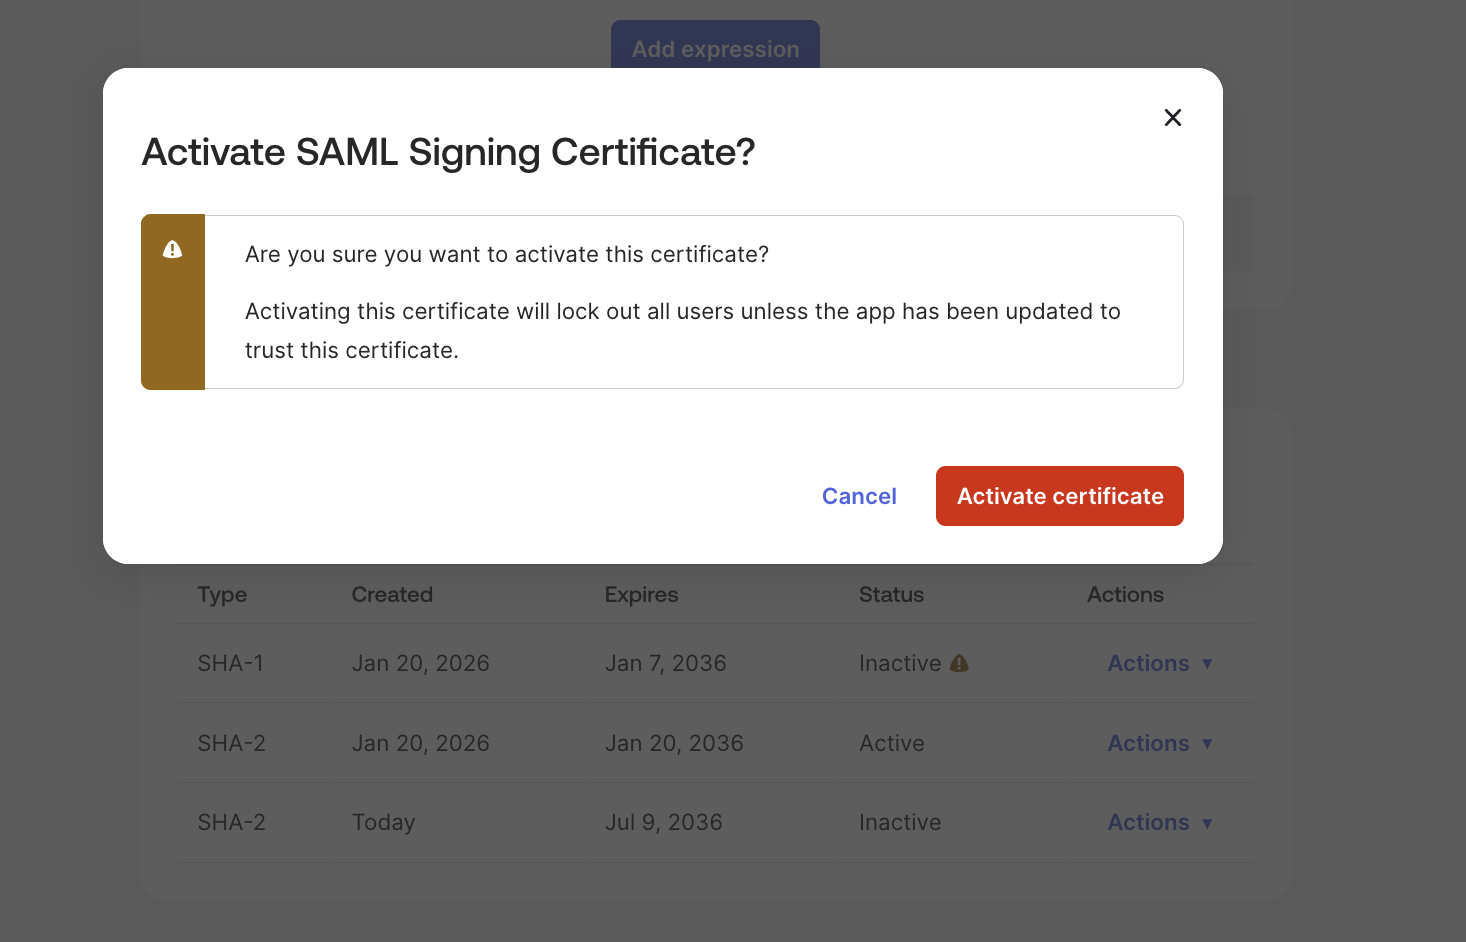
- In the Actions column, click Activate. Its status changes to Active and the previous certificate becomes Inactive.
Refresh the metadata in Persona
If Persona already has your live Identity Provider metadata URL, the renewed certificate is picked up automatically — skip these steps. Otherwise:
- In Okta, copy your Identity Provider metadata URL from the Sign On tab (format:
https://dev-12345.okta.com/app/abcdefg/sso/saml/metadata). - Log in to your Persona dashboard as a user with Admin permissions.
- Navigate to Organization > Security.
- Under Single Sign-On, click Set up / Edit.
- Enter the metadata URL and click Get metadata (or upload the updated metadata XML file).
FAQs
Does Persona support JIT provisioning via SAML?
Yes, we support JIT provisioning for users.
Is there an API for creating and disabling users?
We currently don’t have an API for creating/disabling users.
Is it possible to send over the user’s role in Persona as an attribute in the SAML assertion?
At the moment, all new users will be set to an Organization’s default role configured from within the dashboard. We do not currently support sending a user’s role as an attribute, but if this is a high priority for your team please reach out to your Persona contact or Persona support to let us know about your need.
Access to SAML-based SSO with Okta by plan
| Startup Program | Essential Plan | Growth Plan | Enterprise Plan | |
|---|---|---|---|---|
| SAML-based SSO with Okta | Available | Available | Available | Available |
| SCIM with Okta | Not Available | Not Available | Not Available | Available |